Sims2Pack Clean Installer Manual
Welcome to the Sims2Pack Clean Installer manual for version 1.5.1.4. This manual was written by Karen Hess (modernK).
This manual will refer to the Sims2Pack Clean Installer as S2PCI. Also, the words "folder" and "directory" are used interchangeably.
Table of contents
- Installation
- Using S2PCI to Install .Sims2pack Files
- Using S2PCI to Install ZIP and RAR Archives from a Windows Folder
- Browsing Folders and Removing Unwanted Package Files
- Repackaging a .Sims2Pack File
- Checking for Updates
- Creating a .Sims2pack File
Installation
Before installing the program for the first time, make sure you have the latest version of the Microsoft .NET Framework installed.
If you are upgrading or reinstalling the program, you must first remove the current version of S2CI from your system.
NOTE: When you install S2PCI, the program sets itself to be the default package installer. If you want to return to the Maxis package installer, you must manually change the file association for .Sims2pack files. (Search Windows Help for information on associating files.)
If you are installing S2PCI for the first time
First, make sure you have downloaded and installed the latest version of the .NET Framework from Microsoft. Click on the link at the bottom of the S2PCI Downloads page to go to the Microsoft site. The Microsoft site has information about the .NET Framework.
After installing the .NET Framework, install S2PCI:
- Download the latest version of S2PCI from the Sims2 Clean Installer Downloads page.
- Run the installer by double-clicking on the icon and, on the resulting screen, click Run.
- On the next four screens, click Next, I Agree, Install, Finish.
- Restart your computer.
If you are upgrading or reinstalling S2PCI
First, you must remove the previous version from your system:
- From the Start menu, select Programs > Sims2Pack Clean Installer > Uninstall.
- Click Uninstall.
- Click Close.
Next, install S2PCI:
- Download the latest version of S2PCI from the Sims2 Clean Installer Downloads page.
- Run the installer by double-clicking on the icon and, on the resulting screen, click Run.
- On the next four screens, click Next, I Agree, Install, Finish.
- Restart your computer.
Using S2PCI to Install .Sims2pack Files
When you install S2PCI, the program sets itself to be the default package installer. The first time you select a .Sims2pack file to install it, S2PCI opens the file.
- Double click the .Sims2pack file you want to install. You see a window that looks similar to this:
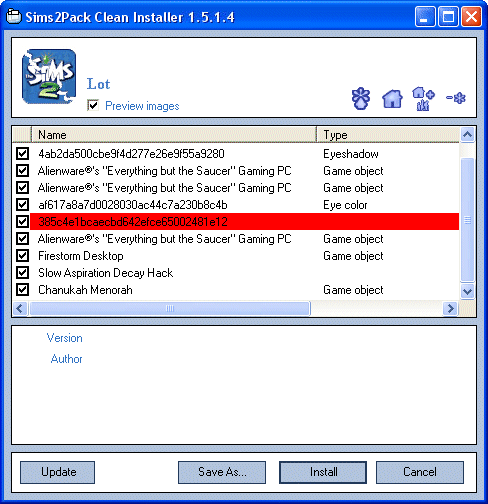
- Package files coded in red are known hacks, or other objects that override the standard game rules. You probably want to delete these (unless they are Maxis items).
- Package files coded in pink are duplicate files. (This is more important when browsing your downloads folder.)
If you select the Preview images checkbox (selected by default), S2PCI displays an example of the textures or images contained in the package. These images are displayed in a small window that opens separately when you click on a package. Select the Auto size option if you want the window to resize itself based on the size of the image.
WARNING: Sometimes removing packages will cause problems with loading the lot. It is usually safe to remove items that have the type "Game object".
Not all hacks are known (the list is expanding all the time). However, the Sims2Pack Clean Installer gives you a lot of information about the package files within lots, so you can use your judgment to decide which of those files might be dangerous.
- When you have opened the package with S2PCI, you can then choose which package files to include with your install by selecting the checkbox for any package you want to install, and clearing the checkbox for any package you don't. S2PCI provides some handy icon buttons to help with selecting and clearing checkboxes:
 Select all files - Any cleared checkboxes are selected again.
 Select lot file only - Clears all checkboxes except lotSegmentForUpload.
 Select lot and family - Clears all checkboxes except lotSegmentForUpload, familySegmentForUpload, and Persons.
 Select all files except for hacks - Clears checkboxes for identified (known) hacks. Hacks not coded in red will remain selected.
You can use S2PCI to remove a family from a lot without removing the furniture by clearing only the checkboxes familySegmentForUpload, and all Persons on the lot.
- After choosing which package files to include with the lot, click Install to install the lot. The Installing packages dialog appears.
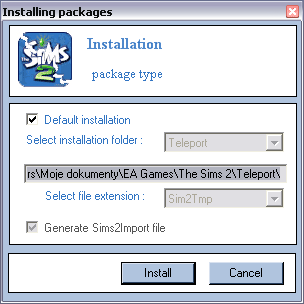
- Ensure that the Default installation checkbox is selected and click Install.
- Click Okay to the message that all files were successfully installed.
Installing ZIP and RAR Archives from a Windows Folder
S2PCI v1.5.1.4 allows you to install the contents of a group of ZIP or RAR archives contained in a Windows folder. If you have a group of archives you want to install in a single operation, first create a new folder in Windows and then place the archives in it.
NOTE: The current version of S2PCI cannot open "nested" archives (for example, a RAR archive that contains other RAR archives). You will have to extract any nested archives into the Windows folder before installing.
If you do not have a recent backup of your Downloads folder, now would be a good time to create one. 
To install a group of ZIP or RAR archives contained in a Windows folder:
- Right click on the folder.
- In the resulting shortcut menu, select Install all. The Sims2Pack Clean Installer window tells you how many files S2PCI found and lists them:
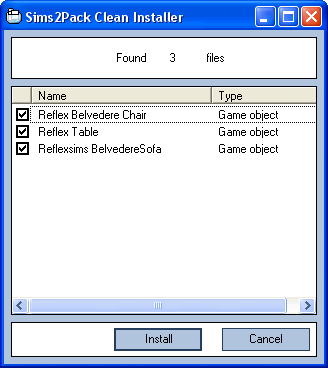
- Click Install. You see an information message telling you that the files were successfully installed.
- Click OK.
- The Sims2Pack Clean Installer window appears. Click Cancel.
WARNING: Do not click Install a second time, or you could end up losing files.
Browsing Folders and Removing Unwanted Package Files
S2PCI allows you to review the contents of your Sims 2 Downloads folder, or other directories where Sims2 package files are stored. By doing this you can identify hacks, duplicate files, and empty packages, and then enable, disable, or remove them. (If you are not sure about removing them entirely, you can disable them first, or you can move suspect files to separate directory.) These actions are available using a shortcut menu that appears when you click the right mouse button.
Moving files to a separate directory can also help you organize your Sims 2 Downloads folder by creating subfolders for walls, floors, terrain paints, game objects, hacks (if you use them), and object recolors.
NOTE: Do not place the following types of packages in subfolders, or they will not be available in your game:
- eye color
- glasses
- lipstick
- blush
- eyeliner
- eyeshadow
- costume makeup
- skin tone
- hair color
- hair mesh
- clothing
S2PCI can also help you track down what type of content is in package files with non-descriptive names. Using the Preview images option, you can see an example of the texture or image contained in the package file. This can often help to identify the object.
To browse your Downloads folder, or other folders, start S2PCI by double-clicking its desktop icon. You see a window that looks like this.
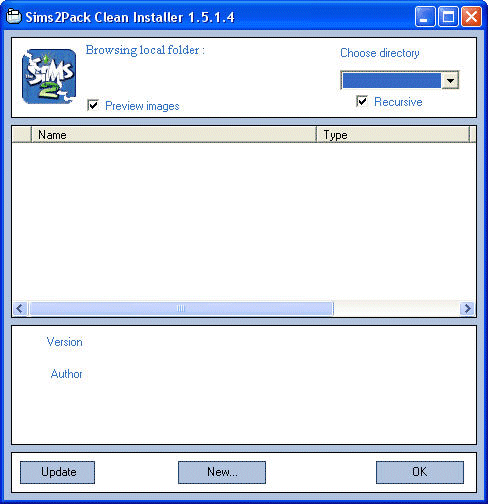
If you select the Recursive checkbox (selected by default), S2PCI will include the contents of subfolders contained within the folder you select. Clear the checkbox if you do not want to include the contents of subfolders in the list.
NOTE: To create a list that excludes the contents of subfolders, you must clear the Recursive checkbox first, then select the directory.
If you select the Preview images checkbox (selected by default), S2PCI displays an example of the textures or images contained in the package. These images are displayed in a small window that opens separately when you click on a package. Select the Auto size option if you want the window to resize itself based on the size of the image.
In the Choose directory list box, select the directory you want to look at:
- Select Downloads to open the My Documents/EA Games/The Sims 2/Downloads directory. (If your Downloads folder is in another location, use Browse.)
- Select SavedSims to open the My Documents/EA Games/The Sims 2/SavedSims directory.
- Select Teleport to open the My Documents/EA Games/The Sims 2/Teleport directory.
- Select Browse to open the Browse for Folder window and navigate to the directory you want to open.
NOTE: If you have a large number of packages installed, S2PCI will take some time to read in all the files. This is particularly true of the Downloads folder. When all the packages are loaded, the Number of packages count will appear below the name of the folder in the top left of the screen. If you have subfolders in the directory you are browsing, then the count value can change depending on whether the Recursive checkbox is selected.
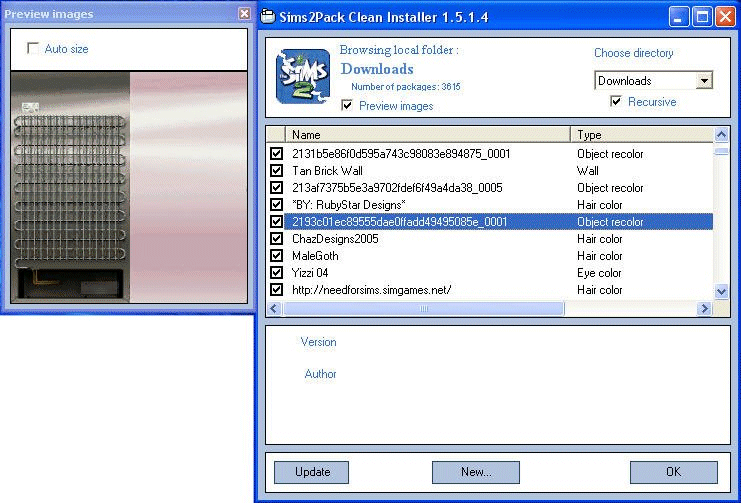
Select a package file and click the right mouse button to see a shortcut menu with the following options:
- Enable package - selects the checkbox associated with the package file
- Disable package - clears the checkbox associated with the package file
- Remove package - permanently deletes the package file (click Yes in the resulting dialog to confirm)
- Move To...
- allows you to specify a folder to move the package file to:
- Downloads - moves the file to the My Documents/EA Games/The Sims 2/Downloads folder
- New... - allows you to create a new subfolder within the My Documents/EA Games/The Sims 2/Downloads folder and move the selected package file into it
- Browse... - allows you to navigate to a different folder and move the selected package file into it
NOTE: You cannot select or clear the checkbox associated with a package file by clicking on it. You must use the shortcut menu to do this.
If you expand the S2PCI window, other information about the package files is available.
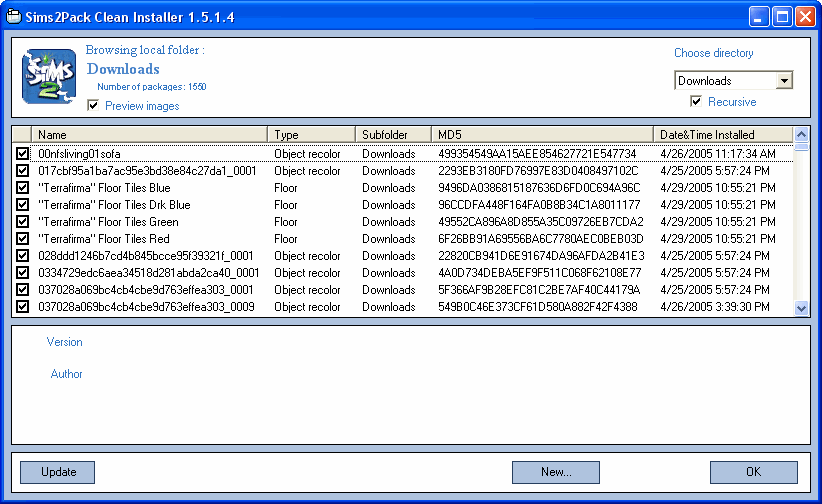
An expanded window shows the following information:
- Name - The name of the package or object as defined by the creator. (This might not be the same as the package file name as it shows up in the folder.)
- Type - The type of Sims 2 object contained in the package. See Browsing Folders and Removing Unwanted Package Files for more information.
- Subfolder - The subfolder or folder where the package file is located.
- MD5 - A checksum created by a hashing technique that results in a 128-bit message digest. This provides a technical way of checking for package files that have exactly the same content.
- Date&TimeInstalled - A timestamp showing when you installed the package file.
You can sort the package file listing in different ways by clicking on these headers. For example:
- Clicking on Name once sorts the list in ascending alphabetical order. Clicking on Name again sorts in descending alphabetical order.
- Clicking on Type groups package files together by function (for example, all clothing files will appear together).
- Clicking on Subfolder groups package files together based on the folder or subfolder that contains them.
- Clicking on MD5 allows you to group duplicate files together. You can use the MD5 sort to ensure that you delete only the repeats, and not all copies of the file.
- Clicking on Date&TimeInstalled once sorts in ascending time order. Clicking on Date&TimeInstalled again sorts in descending time order. You can use the Date&TimeInstalled sort to identify recently installed files if a problem suddenly occurs in your game.
Repackaging a .Sims2pack File
If you want to share houses you have created, but not custom content (especially hacks), S2PCI allows you to create a package that contains only the lotSegmentForUpload file and any other files you choose to include. You can also use S2PCI to remove a family from a lot without removing the furniture.
NOTE: When you package a lot to a file in the game, the files are located in the My Downloads/EA Games/The Sims 2/Packaged Lots folder.
To repackage a .Sims2pack file:
- Double click the .Sims2pack (lot) file you want to repackage. You see a window that looks similar to this:

WARNING: Sometimes removing packages will cause problems with loading the lot. You should do a test install of your new lot before sharing it with others.
- When you have opened the .Sims2pack file, you can then choose which files to include with your packaged lot by selecting the checkbox for any package you want to include, and clearing the checkbox for any package you don't. S2PCI provides some handy icon buttons to help with selecting and clearing checkboxes:
 Select all files - Any cleared checkboxes are selected again.
 Select lot file only - Clears all checkboxes except lotSegmentForUpload.
 Select lot and family - Clears all checkboxes except lotSegmentForUpload, familySegmentForUpload, and Persons.
 Select all files except for hacks - Clears checkboxes for identified (known) hacks. Hacks not coded in red will remain selected.
You can use S2PCI to remove a family from a lot without removing the furniture by clearing only the checkboxes familySegmentForUpload, and all Persons on the lot.
- After choosing which package files to include with the lot, click Save As....
- In the Select Filename window, enter a name for the new .Sims2pack file and click Save.
- Click Cancel to close S2PCI.
Checking for Updates
To conveniently check for updates to the Sims 2 Pack Clean Installer, click
Update. S2PCI uses your Internet connection to check the S2PCI web site for updates.
NOTE: Unlike some programs, S2PCI does not "automatically" check for updates. You must click the Update button to use this feature.
If you don't want to use this feature, you can just check the web site yourself. 
Creating a .Sims2pack File
This is a quick way to group package files together for easy installation. For best results with S2PCI v1.5.1.4, follow these instructions exactly:
- Start S2PCI by double-clicking its desktop icon.
- Clear the Preview Image checkbox (this is actually important, so do not skip this step).
- Browse to the folder that contains package files you want to put in your .Sims2pack file.
- Select the files you want in the .Sims2pack file.
- Click New....
- In the Select filename dialog, enter a filename for the .Sims2pack file and click Save.
- In the FormNew dialog, enter a description for the file and click Create.
- Click OK.
- The Select filename dialog appears. Click Cancel (another important step).


